WIP of an environnement concept art rejected
on September 5th, 2009, by DeevadI take the opportunity of having a first WIP post about a “not totally but” rejected early concept art. So ; I will explain here the key moment of my workflow for 2D environnement , It will probably sound strange ; but I’m using mainly at first not Alchemy or Mypaint in this case but …. Blender ! Let’s me show you how and Why:
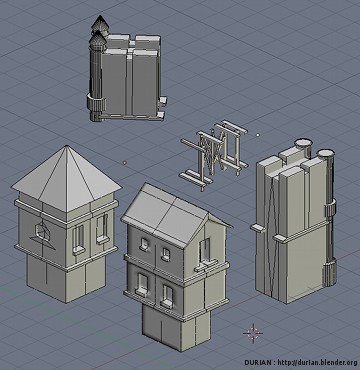
1- Build my “lego” like toy : low poly object library
Why start with Blender ? Simply cause it’s time saving. as a drawer a city represent a lot of work for the perspective / the design / the light and the angle of camera ( composition too ) ; with the help of Blender I can compress this time to a couple of hour.
First job is to create some toys ; and have a little library of some objects ; I started here with a subdivided cube for each of those objects ; after removing some faces of the cube to preserve 1/4 of the shape , I apply a mirror modifier and most of the time apply to the Y and X axis. I model this way only 1/4 of each building.I use the last layer of “Blender layers panel” to stock my blocks, and I take care to name them correctly. When finish ; I do a first Alt+D copy ( linked copy to the original ) , and move the copied object to the first layer. Why I named them correctly ? ( ex : Building_1 / City_Wall / etc… ) Simply cause this kind of simple 3D object I like to reuse them in other works with a simple “append”, so it’s always faster to know what to append in the long long object list.
2- The story of a simple 3D town
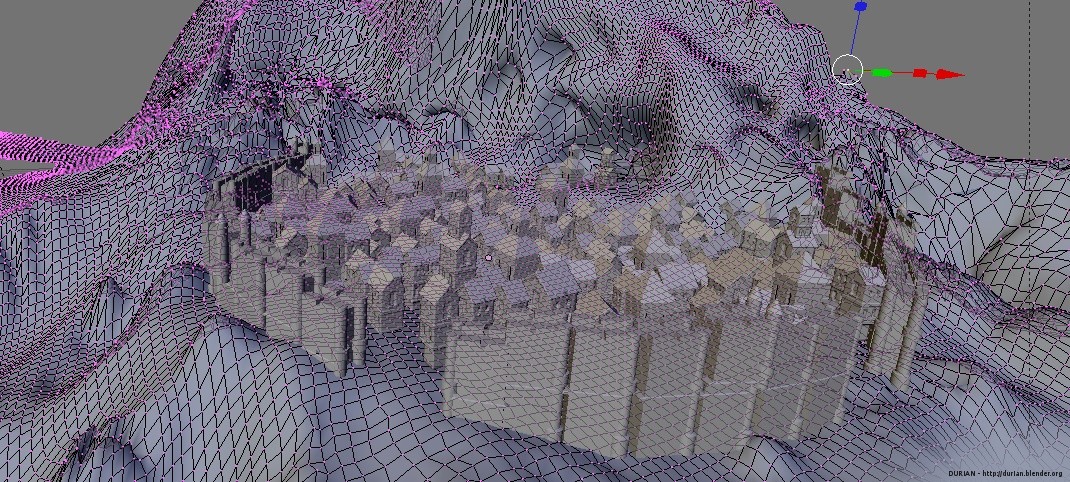
On my first layer ; I set up a first square of houses and building ; and play to invent new building while combining them ; I still use Alt+D to copy my object ; If I want to add a detail to one in edit mode ; all other will be updated at the same time.
It can save time if I decide to re-use the scene and just change the shape of roofs ; or add only rounded windows.
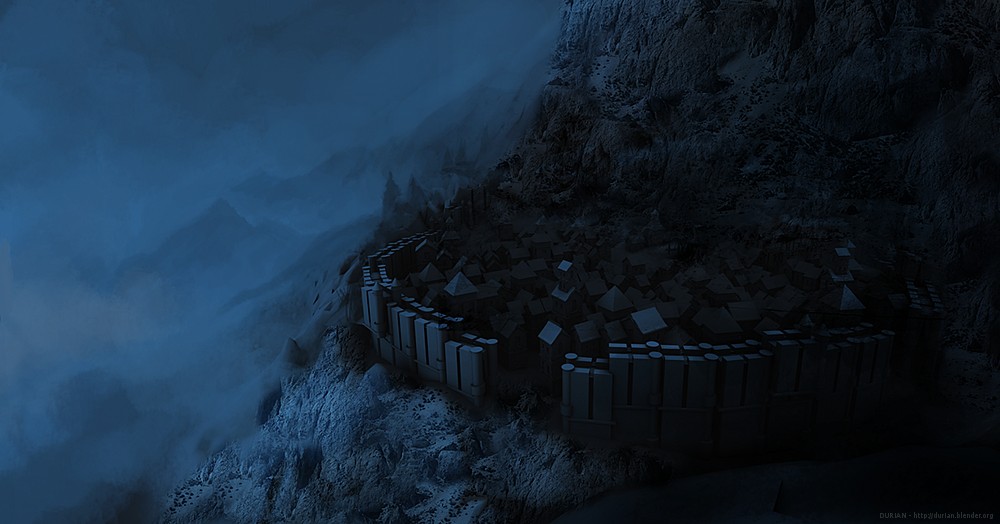
For the moutain & floor ; I just sculpted fastly a plane with some textured brush ( musgrave ) ; I choose the “grab” option to be more speed ; and I keep it not too much subdivided to have a light-weight file and a happy computer. ( even if a scene like this grow fastly to more than 2.000.000 polygon ) . My laptop still handle it , so I can turn around easily and find a good shot with a Camera.
3- Material & rendering
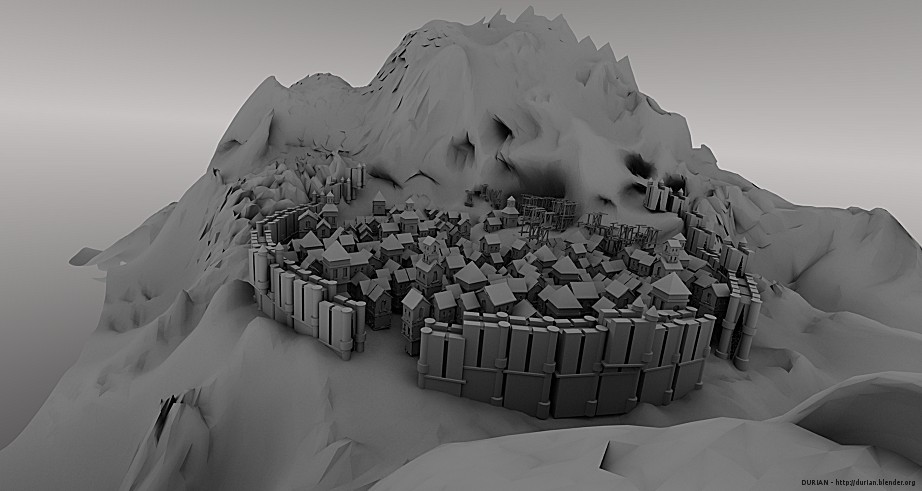
I didn’t setup a lot the lightning , and usually I prefer to let the Ambiant Oclusion ( ray traced ; with the max ‘samples’ ; it take may be time ; but the job is always perfect to me ) and I add just a simple grey gradient for the background.
Sometime , I save more than one rendering ; I try just a simple sun light ; or a approximate ; Just to have more information to work on Gimp after.
For the material ; I use a white smooth material that don’t have specular point ; very simple to create.
4- Time for a Gnu Image Manipulation Program ; GIMP
I just open my result on GIMP 2.6 ; patched with gimp-painter , and the brush presets Gimp Paint Studio ( you will find links in one of my previous post here ) . I grabed a photo from the wikipedia page about Mountain , and pasted it ; playing with blending modes ; shadowing with a big brush on Multiply ; and highlight some other part with Softlight or Dodge to obtain the result above. Notice that I didn’t work on the details ; I keep it global and zoom in very rarely in my picture.
When I finish this step I double the size of my files to get more pixels ; cause the step after require some digital painting.
5- Digital painting ; or paint over
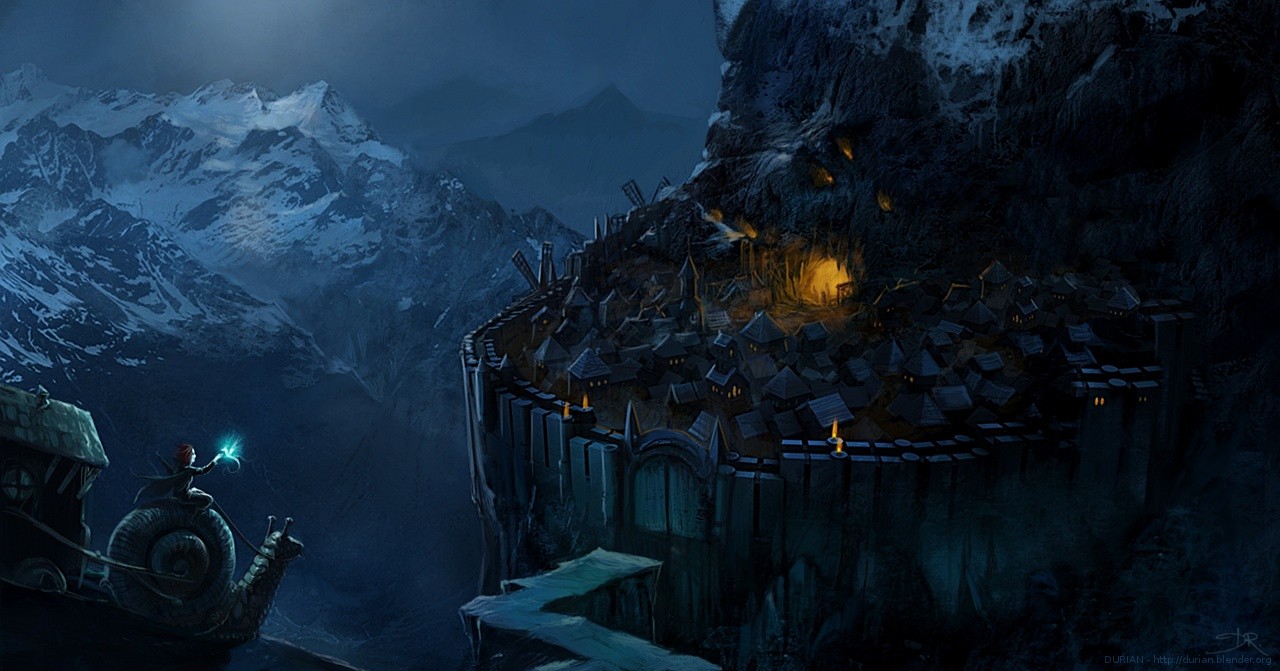
Final step is to patiently paint all the details to make the picture look like what I had in mind ; ( ok another mountains from wikipedia added on the background before having a paint over ) . But painting details is fun is the details are not just some rendering , or just to add more resolution to the piece. I used mainly the brush preset “Oil1-Small ” from Gimp Paint Studio ; and played with the opacity a lot. For textures ; I used the Brush ‘foliage_1’. I finish with a airbrush simple round brush in the blending mode “Dodge” to make some glowing point ; Fire, cave and little misterious little bioluminescent dragon.
You can see too how I simplify the picture to get a uniform background back the character in the foreground to read the silhouette better ; or how I set the value of the town to be darker than the moutain background. All in all it’s just a simple 3 ground composition ( Foreground / Middleground / Background ). And all the elements are placed on a curve that’s start at the bottom of the left part to finish on the top of the right part. ( eyes are leaded with the value of the points on this “reading axe curve” ). This axe is always the best to place somes elements for the cultures that read from the top-left to the right-bottom ; cause our key elements come in an opposite direction as the usual way to read , and the result is a better dynamic in the picture ; and almost the feeling in our exemple above that the snail move to the town. Just a composition trick 😉
6- Rejected …but ! We have cool news
To start concept while waiting a script is always stupid risky ; and this illustration suffered from the last version of the script. But not in all is loosed ; cause I hope this WIP helped you to imagine better how I work for a complex environment and may be give you the inspiration to start your own imaginary town this week-end as a cool hobby.
And the cool news ? …
We talked this evening Brecht, Colin , Ton and I about keep on the blog the total work in progress week after week of the first sequence of the Durian movie ; this will still keep secret the surprise of the movie ( story / Design …etc ) and you will got some direct feedback on the Storyboard / Concept Arts / Modeling / Texturing / Rendering & Test for all this first sequence in realtime ! Simply amazing . So, I imagine the best way to follow our production from inside and react about. Prepare to get some WIP about more concept art and Storyboard next week 😀
I will let Colin post the script of this first sequence and decide as a director what to show or not, the good news is the main character and the giant snail are in the first sequence 😉
– David


September 5th, 2009 at 2:36 am
Wow…. just wow. Your image is beautiful. I want it as a wall poster 😀
And the technique draws out the same reaction and makes me want to try to.
September 5th, 2009 at 3:38 am
Don’t know if it helps any, but looks like a town in an isolated region, you thought about looking at Mononoke Hime’s “Irontown” for inspiration? just a thought.
September 5th, 2009 at 4:05 am
that is cool news! great work, and i love the openness of it all.
i wish i had half the energy and ambition you all do… it’s fascinating =D
here’s to continued excellent development and news
cheers!
September 5th, 2009 at 5:00 am
Yay for the giant snail. \o/
🙂
September 5th, 2009 at 6:17 am
What’s that cave in the middle of the town?
Maybe something is hiding there 🙂
September 5th, 2009 at 7:04 am
Dang, the image looks beautiful but why would anyone choose to ride the slowest animal known to mankind? Or is this like the “turbo snail” from “Never Ending Story”?
September 5th, 2009 at 7:12 am
Wow this are really great news, this weekly wips will avoid everybody to bait their nails jajaj Those are really nice techbiques for fast concepts thanks again. when i first looked at the picture a remembered a few beowulf environments scenes, if you dont know the movie here is the trailer. http://lacuria.com/20070728482/beowulf-trailer It have some interesting medieval shots, and also a dragon.
September 5th, 2009 at 7:16 am
Wow. Amazing. Thanks for the simple tutorial and the news about the project updates. I am so buying a DVD once payday comes for me. Soon… so soon…
September 5th, 2009 at 7:25 am
Hint: create your buildings in modular parts, but all using the same center point. See here: http://mke3.net/projects/work/lighthouse_buildings.png
This lets you very easily mix and match building parts to create all kinds of different permutations, and you can position them as simply as snapping the location/rotation (Ctrl C -> copy location / rotation). Then once the buildings are already set up, you can change the style very easily by selecting each part and swapping out the mesh data/group data within the object.
cheers
September 5th, 2009 at 8:06 am
We will learn a lot from this kind of posts. Both techniques, and process of a big project.
I guess it will bring additional attention to Durian project from people outside Blender community.
Thanks!
September 5th, 2009 at 8:10 am
interesante técnica 🙂
yo apoyo que se vaya diciendo el WIP de la semana en esta blog 🙂
saludos…
September 5th, 2009 at 8:33 am
Niiiiiiiiccceeee!!!!!! Love it!!
September 5th, 2009 at 8:35 am
Wait is that a giant snail? Like Never ending story? Cool!
September 5th, 2009 at 10:07 am
Very nice making of… You folks are an inspiration to all of us… 🙂
September 5th, 2009 at 11:02 am
That’s precisely what i’m looking for when i browse this blog.
(Si possible, essayez de nous faire une petite piste en français pour les tutos du DVD ;))
September 5th, 2009 at 11:43 am
It’s a great location and great concept!
Wow! I’m relief to know that I follow exactly the same procedure to make my concept drawings 🙂
At exemplification title only:
I went from here:
http://img177.imageshack.us/img177/2352/halloweensamurairef.jpg
…to here:
http://rogper.cgsociety.org/gallery/703188/
And, until now, I was embarrassed to admit it… to my self ^_^
Thank you 😉
Now, just a thought.
Although riding a Snail must be much smoother then a 4 legs mammal, making a long ride sitting in the top of the shell must still be… uncomfortable 🙂
I don’t know if it work at all but why not some kind of cool snail settle!?
September 5th, 2009 at 12:24 pm
Thank you very much.
This is the first time that can follow the Blender Org Production.
I understand that any one is busy with their jobs and creative processes but to write information about what happen (if possible) on real time is so important.
Like this I fell a really bridge from Durian to me.
If possible all Durian member could write some words about what their doing little lines are enough.
This way all the blender artist will grow together with Durian team and if you need some help all community can help you because we’ll know what happen and what’s is necessary to complete the job.
To write a blog and work hard is very difficult… but try please try it help us to stay side by side on this amazing project.
Now I saw a little piece of your work and I have a lot of Ideas to work with.
Thank you very much.
Congratulation now I’m feel one of your friends.
Go a head and do your best Durian Team.
(my English is simple sorry for some mistakes 🙁
September 5th, 2009 at 2:37 pm
Thank you very much David. It is so inspiring to see how you work.
The image looks fantastic. I also like the way you play with the warm and cold colours.
September 5th, 2009 at 3:13 pm
The result is fantastic, good continuation for the durian project
September 5th, 2009 at 5:58 pm
And this is why you guys are part of the Durian team 😀
Amazing image.
September 5th, 2009 at 9:21 pm
Too be honest, i prefered the feel and geography of the penultimate drawing.
September 6th, 2009 at 1:11 am
“The good news is the main character and the giant snail are in the first sequence “.
Are you kidding?
September 7th, 2009 at 4:15 am
Hey great stuff, i’m loving this!!
September 7th, 2009 at 4:24 am
yeah!
really really professional!
great stuff!
September 7th, 2009 at 6:04 am
Ive only just started getting into the concept art side of things after buying a graphics tablet, and this article has really inspired me to get into it more.
The technique of involving blender to get the general structure of the picture first is amazing, I never thought of doing something like that!
Thanks!
Cheers,
Alex (AD-Edge)
September 8th, 2009 at 5:12 am
Dude! This is just plain inspiring! I love how you don’t get bogged down in the technology, and just use it to boost up your workflow.
Some brilliant ideas! I gotta try this!
September 9th, 2009 at 3:30 pm
Wery wery cool nice idea you dont waste time drawin perspective for those litle hauses and city wals everithig looks nice. (sory for may English)
September 10th, 2009 at 1:33 pm
Wow..cool, really 🙂
Verry inspiring art…
December 2nd, 2009 at 6:14 pm
This final photo is fantastic!
The only thing I can critisize is that the mountains look a bit set down in the background…
August 26th, 2010 at 10:00 pm
Wow, great idea! I’m working on an enormous game project, and I am using your building block system to make the city where the game takes place! I made about six types of windows, doors, walls, rooftops, and other accessories and with them I can create almost limitless building possiblities. I though I would have to model the whole city, but I just have to copy and paste!
Thanks for the tutorial, and I can’t wait to see Sintel.